Difference between revisions of "FreeNAS Corral 10.x setup"
From FreeNAS using Active Directory Wiki
m (→Initial connection: that's it for today) |
m (→Initial connection: added Gateway & DNS addresses) |
||
| Line 25: | Line 25: | ||
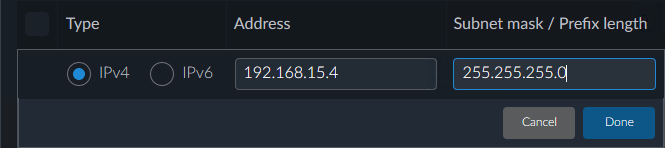
** Click the IPv4 radio button, and add '''192.168.15.4''' under Address, and '''255.255.255.0''' under Subnet mask / Prefix length and click '''Done''', then click '''Save''' at the bottom of the page, and then click '''Save''' again. | ** Click the IPv4 radio button, and add '''192.168.15.4''' under Address, and '''255.255.255.0''' under Subnet mask / Prefix length and click '''Done''', then click '''Save''' at the bottom of the page, and then click '''Save''' again. | ||
**[[File:FreeNAS Corral 10.0 Enter IPv4 address and subnet mask.png]] | **[[File:FreeNAS Corral 10.0 Enter IPv4 address and subnet mask.png]] | ||
| + | ** Then click on '''Settings''' under Interfaces, and change the following: | ||
| + | *** Hostname: freenas.mai-dev.net | ||
| + | *** HTTP Proxy: leave blank | ||
| + | *** '''DHCP Settings''' | ||
| + | **** Assign Gateway: uncheck | ||
| + | **** Assign DNS: uncheck | ||
| + | *** '''Gateway Settings''' | ||
| + | **** IPv4: 192.168.15.1 | ||
| + | **** IPv6: leave blank unless you're actively using IPv6 in your environment | ||
| + | *** '''DNS Settings''' | ||
| + | **** IP Addresses -> Add DNS Address: '''192.168.15.3''' | ||
| + | **** Search Domains -> Add Search Domain: mai-dev.net | ||
| + | *** Click '''Save''' | ||
Revision as of 19:44, 17 April 2017
Before we start
- We used a virtualized setup in order to create this walkthrough, using generic domain & computer names where possible.
- We used the private IP address range of 192.168.15.x - obviously you'll want to replace our internal IP addresses with your own
- We used a single Active Directory domain controller, to keep things simple. We then configured the following network settings, which is reflected throughout this document:
- Gateway: 192.168.15.1
- DNS: 192.168.15.3
- NTP: 192.168.15.3
- DC (Domain Controller): 192.168.15.3
- FreeNAS Corral: 192.168.15.4
- We used a single Active Directory domain controller, to keep things simple. We then configured the following network settings, which is reflected throughout this document:
- Where appropriate, we'll make a note of where additional server IP's can be entered, for redundancy
- Generic Password: HorseBattery@2017
Getting started with FreeNAS
Initial connection
- When FreeNAS Corral 10.0 is first installed, the network adapter is set to DHCP - we will change this a few steps down. We will be configuring FreeNAS purely from the webUI, so make a note of the IP on the FreeNAS server console:

- Use your favorite web browser to connect to that address - The FreeNAS webUI will prompt you for a password, for the default user root using the password you set during the installation routine.
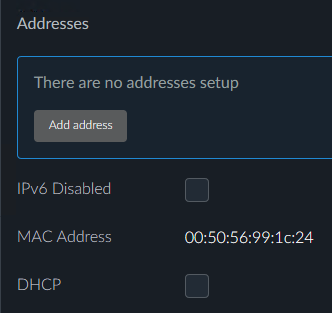
- To change from a dynamic IP to a static IP, after you log in, on the left menu click on Network -> Interfaces -> "Interface name" (dhcp)

- On the next screen, uncheck DHCP, and then:
- Click on Add address
- Click the IPv4 radio button, and add 192.168.15.4 under Address, and 255.255.255.0 under Subnet mask / Prefix length and click Done, then click Save at the bottom of the page, and then click Save again.
- Then click on Settings under Interfaces, and change the following:
- Hostname: freenas.mai-dev.net
- HTTP Proxy: leave blank
- DHCP Settings
- Assign Gateway: uncheck
- Assign DNS: uncheck
- Gateway Settings
- IPv4: 192.168.15.1
- IPv6: leave blank unless you're actively using IPv6 in your environment
- DNS Settings
- IP Addresses -> Add DNS Address: 192.168.15.3
- Search Domains -> Add Search Domain: mai-dev.net
- Click Save

