Difference between revisions of "FreeNAS 9.2.1.5 setup"
From FreeNAS using Active Directory Wiki
m (→Configuring networking) |
m (added new category) |
||
| (9 intermediate revisions by the same user not shown) | |||
| Line 1: | Line 1: | ||
| + | [[Category:FreeNAS-AD]] | ||
| + | [[Category:FreeNAS-Setup]] | ||
== Before we start == | == Before we start == | ||
* We used a virtualized setup in order to create this walkthrough, using generic domain & computer names where possible. | * We used a virtualized setup in order to create this walkthrough, using generic domain & computer names where possible. | ||
| Line 19: | Line 21: | ||
=== Configuring networking === | === Configuring networking === | ||
* Click on Network -> Global Configuration | * Click on Network -> Global Configuration | ||
| − | ** Hostname: freenas (this needs to match the DNS "A" record & computer account name you created during the Active Directory prep) | + | ** Hostname: freenas (this needs to match the DNS "A" record & computer account name you created during the [[Active Directory Prep|Active Directory prep]]) |
** Domain: example-domain.net | ** Domain: example-domain.net | ||
** IPv4 Default Gateway: 10.10.10.1 | ** IPv4 Default Gateway: 10.10.10.1 | ||
| Line 51: | Line 53: | ||
** Click "Save" | ** Click "Save" | ||
[[File:System Settings Timezone.png]] | [[File:System Settings Timezone.png]] | ||
| + | |||
| + | === Creating a Storage Pool === | ||
| + | * Your storage pool '''has''' to be created before you configure FreeNAS to use Active Directory, however that is beyond the scope of this how-to. | ||
| + | * The [http://doc.freenas.org/index.php/Volumes official FreeNAS wiki] is an excellent resource on creating your storage pool. | ||
| + | * We also suggest giving [http://forums.freenas.org/index.php?threads/slideshow-explaining-vdev-zpool-zil-and-l2arc-for-noobs.7775/ cyberjocks excellent PowerPoint] presentation explaining what VDev zpool, ZIL and L2ARC is. | ||
| + | ** After your pool is created, we suggest creating a dataset specifically for CIFS sharing. | ||
| + | ** Again, the [http://doc.freenas.org/index.php/Volumes#Creating_ZFS_Datasets official FreeNAS wiki] is a good source of info on how to do this | ||
| + | *** When creating the dataset, you have to take into consideration '''how''' this particular dataset will be used. | ||
| + | *** In this how-to, we are assuming the storage will be used to store already compressed files, and the following screenshot reflects that. | ||
| + | **** Dataset Name: downloads | ||
| + | **** Compression level: Off (everything's already compressed already) | ||
| + | **** Share type: Windows | ||
| + | **** Enable atime: Off (unless your backup solution scans this share, then turn it on) | ||
| + | **** ZFS Deduplication: Off | ||
| + | [[File:Create a dataset for CIFS sharing.png]] | ||
| + | |||
| + | === Setting up Active Directory & CIFS === | ||
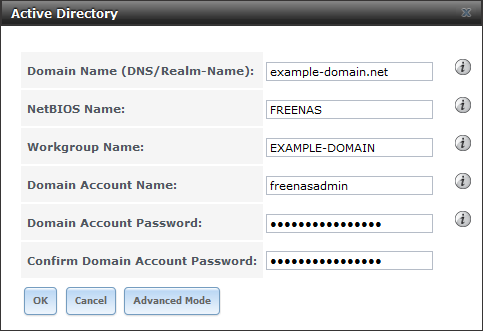
| + | * Click on Services -> Directory Services -> Active Directory | ||
| + | ** Domain name: example-domain.net | ||
| + | ** NetBIOS Name: FREENAS | ||
| + | ** Workgroup Name: EXAMPLE-DOMAIN | ||
| + | ** Domain Account Name: freenasadmin | ||
| + | ** Domain Account Password: StrongPassword1234 | ||
| + | ** Confirm Domain Account Password: StrongPassword1234 | ||
| + | [[File:FreeNAS Active Directory settings.png]] | ||
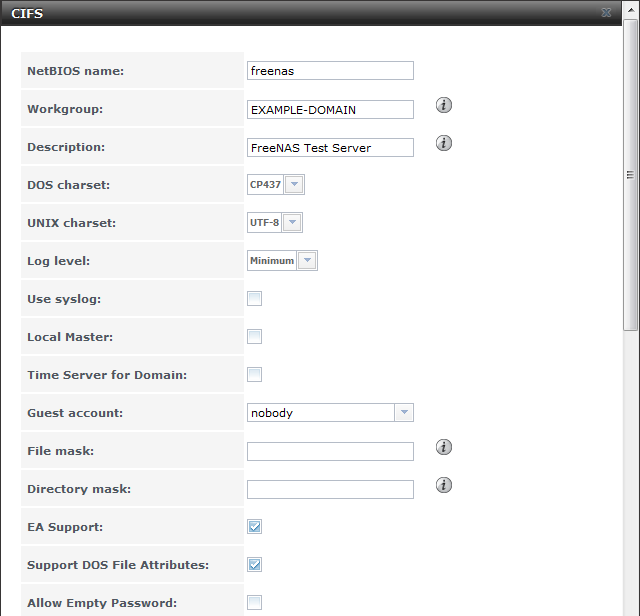
| + | * Click on Services -> CIFS | ||
| + | ** NetBIOS name: freenas | ||
| + | ** Workgroup: EXAMPLE-DOMAIN | ||
| + | ** Description: (optional to fill in) | ||
| + | ** DOS charset: CP437 | ||
| + | ** UNIX charset: UTF-8 | ||
| + | ** Log Level: Minimum | ||
| + | ** Use syslog: unchecked | ||
| + | ** Local Master: unchecked | ||
| + | ** Time Server for Domain: unchecked | ||
| + | ** Guest Account: nobody | ||
| + | ** File Mask: (leave this field blank) | ||
| + | ** Directory Mask: (leave this field blank) | ||
| + | ** EA Support: checked | ||
| + | ** Support DOS File Attributes: checked | ||
| + | ** Allow Empty Password: unchecked | ||
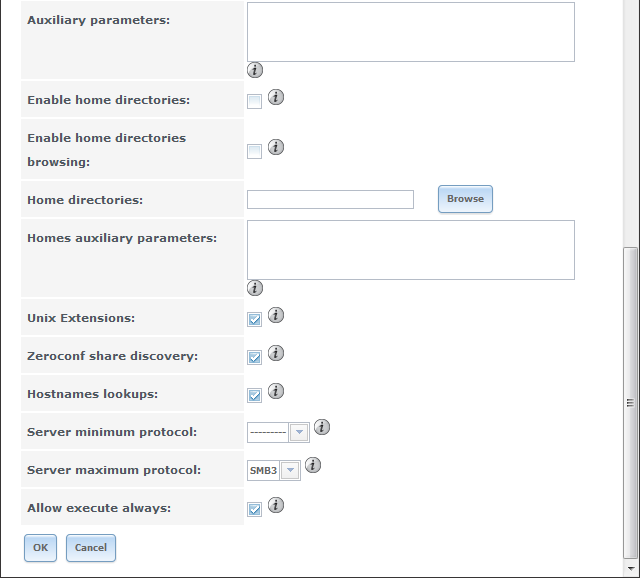
| + | ** Auxiliary Parameters: (leave this field blank) | ||
| + | ** Enable home directories: unchecked | ||
| + | ** Enable home directories browsing: unchecked | ||
| + | ** Home directories: (leave this field blank) | ||
| + | ** Homes auxiliary parameters: (leave this field blank) | ||
| + | ** Unix Extensions: checked | ||
| + | ** Zeroconf share discovery: checked | ||
| + | ** Hostnames lookups: checked | ||
| + | ** Server minimum protocol: --------- | ||
| + | ** Server maximum Protocol: SMB3 | ||
| + | ** Allow execute always: checked | ||
| + | ** Click "OK" | ||
| + | [[File:CIFS Settings top.png]] | ||
| + | [[File:CIFS Settings bottom.png]] | ||
| + | * Click Services -> Control Services | ||
| + | ** Turn on Directory Services | ||
| + | *** This will also automatically turn on the CIFS services. Turning on Directory Services can take up to a minute to start, be patient. | ||
| + | |||
| + | === Creating your share using Windows permissions === | ||
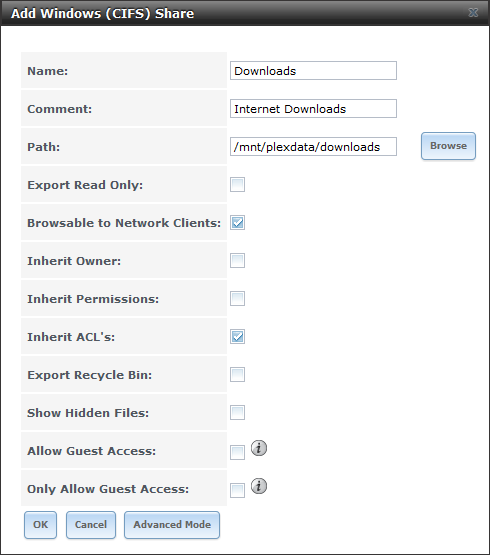
| + | * Click on Sharing -> Windows (CIFS) Shares -> Add Windows (CIFS) Share | ||
| + | ** Name: Downloads (this is the name you'll see when you connect via Windows Explorer) | ||
| + | ** Comment: (optional) | ||
| + | ** Path: (browse to the path of the dataset created previously) | ||
| + | ** Leave everything else at its default setting | ||
| + | ** Click "OK" | ||
| + | [[File:Add Windows share.png]] | ||
| + | |||
| + | === Dataset File/Folder Permissions === | ||
| + | * Now we need to change the default owner & group on the dataset created | ||
| + | * Click on Store -> Volumes | ||
| + | ** Expand your volumes until you find the dataset created for file sharing | ||
| + | ** Click Change Permissions | ||
| + | *** Owner (user): EXAMPLE-DOMAIN\administrator | ||
| + | *** Owner (group): EXAMPLE-DOMAIN\domain users | ||
| + | *** Mode: (unchangeable) | ||
| + | *** Type of ACL: Windows / Mac | ||
| + | *** Set permission recursively: unchecked (unless you have files owned by a FreeNAS user stored in this dataset already) | ||
| + | *** Click "Change" | ||
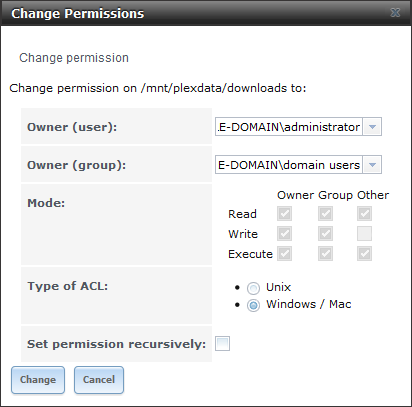
| + | [[File:Dataset for CIFS change permission.png]] | ||
| + | |||
| + | == Verification == | ||
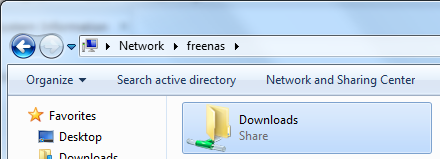
| + | * From a Windows client, open Windows Explorer, and type in '''\\freenas''' - if everything is set properly, you should see the CIFS share you created earlier. | ||
| + | [[File:Windows Explorer - freenas share Downloads.png]] | ||
| + | * Enter into the shared directory, and as a simple test - create a folder. If you're allowed, then it worked! | ||
| + | [[File:Windows Explorer - freenas share test.png]] | ||
| + | * If you go into the FreeNAS shell, you can further verify permissions are using Active Directory style permissions | ||
| + | [[File:FreeNAS with Active Directory permissions.png]] | ||
Latest revision as of 21:25, 17 April 2017
Contents
Before we start
- We used a virtualized setup in order to create this walkthrough, using generic domain & computer names where possible.
- We used the private IP address range of 10.10.10.x - obviously you'll want to replace our internal IP addresses with your own
- We used a single Active Directory domain controller, to keep things simple. We then configured the following network settings, which is reflected throughout this document:
- Gateway: 10.10.10.1
- DNS: 10.10.10.3
- NTP: 10.10.10.3
- DC (Domain Controller): 10.10.10.3
- FreeNAS: 10.10.10.4
- We used a single Active Directory domain controller, to keep things simple. We then configured the following network settings, which is reflected throughout this document:
- Where appropriate, we'll make a note of where additional server IP's can be entered, for redundancy
Getting started with FreeNAS
Initial connection
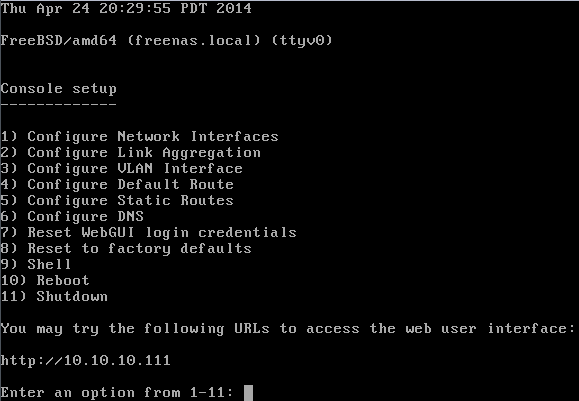
- When FreeNAS 9.2.1.5 is first installed, the network adapter is set to DHCP - we will change this a few steps down. We will be configuring FreeNAS purely from the webUI, so make a note of the IP on the FreeNAS server console:
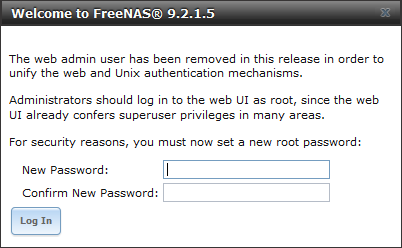
- Use your favorite web browser to connect to that address - the first visit to the FreeNAS webUI will prompt you for a password, for the default user root
Configuring networking
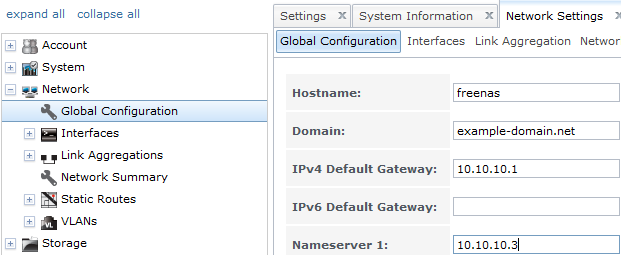
- Click on Network -> Global Configuration
- Hostname: freenas (this needs to match the DNS "A" record & computer account name you created during the Active Directory prep)
- Domain: example-domain.net
- IPv4 Default Gateway: 10.10.10.1
- Nameserver 1: 10.10.10.3
- Click "Save"
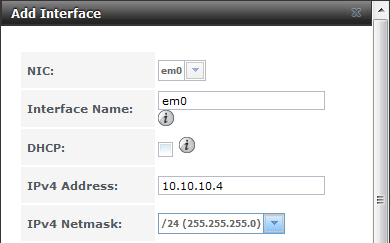
- Click on Network -> Interfaces -> Add Interface
- NIC: select the NIC being used by FreeNAS (single NIC systems only have 1 item in the dropdown list)
- Interface Name: em0 (We named it the same as what FreeNAS names it, for consistency - you can name it whatever you like)
- DHCP: unchecked
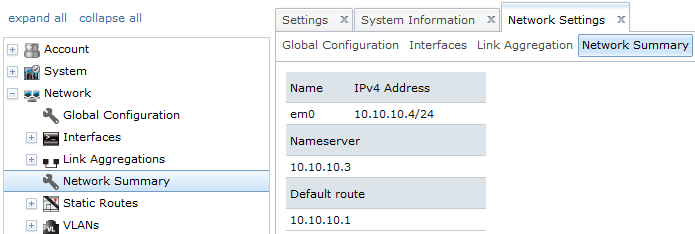
- IPv4 Address: 10.10.10.4 (this needs to match the DNS "A" record you created during the Active Directory prep)
- IPv4 Netmask: /24
- Click "Save"
- The new IP address takes effect immediately - repoint your browser to the new address to continue
- Click on Network -> Network Summary to verify previous settings
Configuring Time Server
- Click on System -> NTP Servers -> View NTP Servers
- Remove all 3 default NTP servers
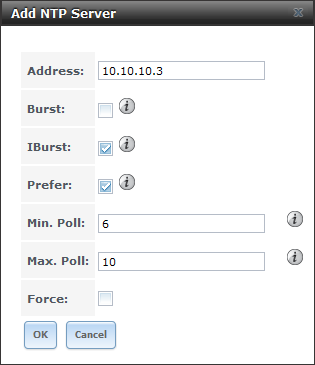
- Click Add NTP Server
- Address: 10.10.10.3
- Prefer: checked (only if you have other time servers configured)
- Leave everything else at its default setting
- Now that the time server is set, you need to set your time zone
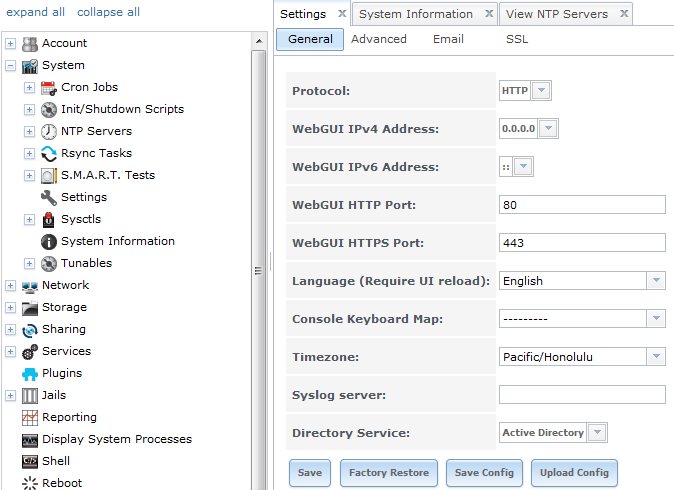
- Click on Settings -> General
- Timezone: (obviously select YOUR time zone)
- Directory Service: Active Directory (since we plan on using Active Directory)
- Click "Save"
Creating a Storage Pool
- Your storage pool has to be created before you configure FreeNAS to use Active Directory, however that is beyond the scope of this how-to.
- The official FreeNAS wiki is an excellent resource on creating your storage pool.
- We also suggest giving cyberjocks excellent PowerPoint presentation explaining what VDev zpool, ZIL and L2ARC is.
- After your pool is created, we suggest creating a dataset specifically for CIFS sharing.
- Again, the official FreeNAS wiki is a good source of info on how to do this
- When creating the dataset, you have to take into consideration how this particular dataset will be used.
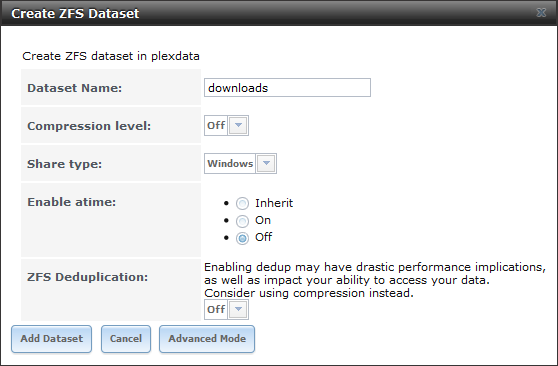
- In this how-to, we are assuming the storage will be used to store already compressed files, and the following screenshot reflects that.
- Dataset Name: downloads
- Compression level: Off (everything's already compressed already)
- Share type: Windows
- Enable atime: Off (unless your backup solution scans this share, then turn it on)
- ZFS Deduplication: Off
Setting up Active Directory & CIFS
- Click on Services -> Directory Services -> Active Directory
- Domain name: example-domain.net
- NetBIOS Name: FREENAS
- Workgroup Name: EXAMPLE-DOMAIN
- Domain Account Name: freenasadmin
- Domain Account Password: StrongPassword1234
- Confirm Domain Account Password: StrongPassword1234
- Click on Services -> CIFS
- NetBIOS name: freenas
- Workgroup: EXAMPLE-DOMAIN
- Description: (optional to fill in)
- DOS charset: CP437
- UNIX charset: UTF-8
- Log Level: Minimum
- Use syslog: unchecked
- Local Master: unchecked
- Time Server for Domain: unchecked
- Guest Account: nobody
- File Mask: (leave this field blank)
- Directory Mask: (leave this field blank)
- EA Support: checked
- Support DOS File Attributes: checked
- Allow Empty Password: unchecked
- Auxiliary Parameters: (leave this field blank)
- Enable home directories: unchecked
- Enable home directories browsing: unchecked
- Home directories: (leave this field blank)
- Homes auxiliary parameters: (leave this field blank)
- Unix Extensions: checked
- Zeroconf share discovery: checked
- Hostnames lookups: checked
- Server minimum protocol: ---------
- Server maximum Protocol: SMB3
- Allow execute always: checked
- Click "OK"
- Click Services -> Control Services
- Turn on Directory Services
- This will also automatically turn on the CIFS services. Turning on Directory Services can take up to a minute to start, be patient.
- Turn on Directory Services
- Click on Sharing -> Windows (CIFS) Shares -> Add Windows (CIFS) Share
- Name: Downloads (this is the name you'll see when you connect via Windows Explorer)
- Comment: (optional)
- Path: (browse to the path of the dataset created previously)
- Leave everything else at its default setting
- Click "OK"
Dataset File/Folder Permissions
- Now we need to change the default owner & group on the dataset created
- Click on Store -> Volumes
- Expand your volumes until you find the dataset created for file sharing
- Click Change Permissions
- Owner (user): EXAMPLE-DOMAIN\administrator
- Owner (group): EXAMPLE-DOMAIN\domain users
- Mode: (unchangeable)
- Type of ACL: Windows / Mac
- Set permission recursively: unchecked (unless you have files owned by a FreeNAS user stored in this dataset already)
- Click "Change"
Verification
- From a Windows client, open Windows Explorer, and type in \\freenas - if everything is set properly, you should see the CIFS share you created earlier.
- Enter into the shared directory, and as a simple test - create a folder. If you're allowed, then it worked!
- If you go into the FreeNAS shell, you can further verify permissions are using Active Directory style permissions
