Difference between revisions of "Active Directory Prep"
From FreeNAS using Active Directory Wiki
m (→FreeNAS setup: fixed link) |
|||
| (4 intermediate revisions by the same user not shown) | |||
| Line 1: | Line 1: | ||
| + | [[Category:FreeNAS-AD]] | ||
| + | == Before we start == | ||
| + | * There is little difference in the Active Directory setup between Window Server 2003 & R2, 2008 & R2, and 2012 & R2. Have not tested Server 2016 yet, but I assume it will be similar as well. | ||
| + | * We used a virtualized setup in order to create this walkthrough, using generic domain & computer names where possible. | ||
| + | * We used the private IP address range of 10.10.10.x - obviously you'll want to replace our internal IP addresses with your own | ||
| + | ** We used a single Active Directory domain controller, to keep things simple. We then configured the following network settings, which is reflected throughout this document: | ||
| + | *** Gateway: 10.10.10.1 | ||
| + | *** DNS: 10.10.10.3 | ||
| + | *** NTP: 10.10.10.3 | ||
| + | *** DC (Domain Controller): 10.10.10.3 | ||
| + | *** FreeNAS: 10.10.10.4 | ||
| + | |||
| + | == DNS Prep == | ||
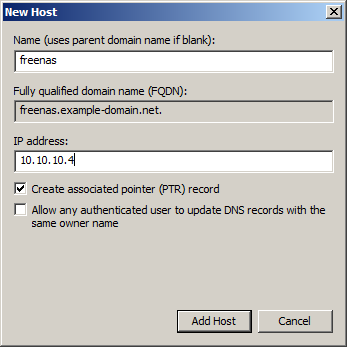
* Create a DNS "A" record | * Create a DNS "A" record | ||
[[File:DNS A record.png]] | [[File:DNS A record.png]] | ||
| + | == Adding a FreeNAS user == | ||
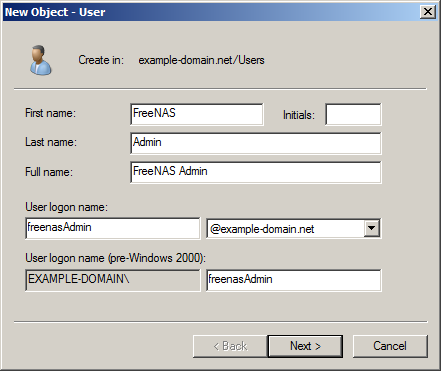
* Create a FreeNAS user specifically for joining the FreeNAS server to the domain, named '''freenasAdmin''' | * Create a FreeNAS user specifically for joining the FreeNAS server to the domain, named '''freenasAdmin''' | ||
[[File:User freenasAdmin creation.png]] | [[File:User freenasAdmin creation.png]] | ||
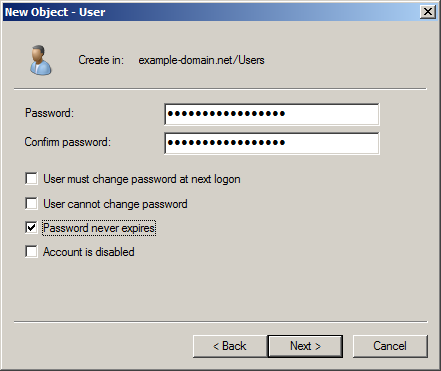
* Create a non-expiring password for user freenasAdmin | * Create a non-expiring password for user freenasAdmin | ||
[[File:User freenasAdmin password.png]] | [[File:User freenasAdmin password.png]] | ||
| + | == Pre-creating FreeNAS computer object in AD == | ||
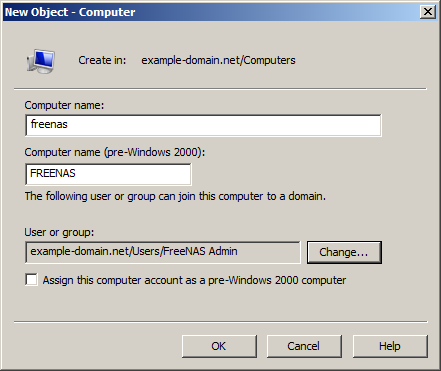
* Create a computer account in preparation for joining the FreeNAS server to the domain. The name should match the "A" record you created earlier. | * Create a computer account in preparation for joining the FreeNAS server to the domain. The name should match the "A" record you created earlier. | ||
** Before clicking OK to finalize the computer account creation, click "Change" and assign the previously created user "freenasAdmin" the ability to join the server to the domain | ** Before clicking OK to finalize the computer account creation, click "Change" and assign the previously created user "freenasAdmin" the ability to join the server to the domain | ||
| Line 13: | Line 28: | ||
[[File:Computer freenas give user freenasAdmin full control.png]] | [[File:Computer freenas give user freenasAdmin full control.png]] | ||
* Verify the accuracy of your server's clock - since every computer joined in the domain will be using the DC as a time server as well, it needs to be accurate. | * Verify the accuracy of your server's clock - since every computer joined in the domain will be using the DC as a time server as well, it needs to be accurate. | ||
| − | + | == NTP server prep == | |
| + | * From a CMD prompt, type '''w32tm /query /configuration''' - if NtpServer shows time.windows.com - you should really think about changing it. | ||
** To change the time server to both use a more accurate clock, and redundant clocks, type the following: | ** To change the time server to both use a more accurate clock, and redundant clocks, type the following: | ||
*** '''w32tm /config /syncfromflags:manual /manualpeerlist:"0.us.pool.ntp.org,0x1 1.us.pool.ntp.org,0x1 2.us.pool.ntp.org,0x1" /update /reliable:yes''' | *** '''w32tm /config /syncfromflags:manual /manualpeerlist:"0.us.pool.ntp.org,0x1 1.us.pool.ntp.org,0x1 2.us.pool.ntp.org,0x1" /update /reliable:yes''' | ||
*** If you got any result '''other''' then "The command completed successfully", verify your command line. View an example successful result [[:File:W32tm command to add multiple time servers.png|<u>HERE</u>]]. | *** If you got any result '''other''' then "The command completed successfully", verify your command line. View an example successful result [[:File:W32tm command to add multiple time servers.png|<u>HERE</u>]]. | ||
*** Restart the Windows time service by issuing the following command '''net stop w32time && net start w32time'''. View an example successful restart [[:File:Restart Windows time service.png|<u>HERE</u>]]. | *** Restart the Windows time service by issuing the following command '''net stop w32time && net start w32time'''. View an example successful restart [[:File:Restart Windows time service.png|<u>HERE</u>]]. | ||
| + | |||
| + | == FreeNAS setup == | ||
| + | * If everything went ok, move on to [[:Category:FreeNAS-Setup|FreeNAS setup]] | ||
Latest revision as of 21:26, 17 April 2017
Contents
Before we start
- There is little difference in the Active Directory setup between Window Server 2003 & R2, 2008 & R2, and 2012 & R2. Have not tested Server 2016 yet, but I assume it will be similar as well.
- We used a virtualized setup in order to create this walkthrough, using generic domain & computer names where possible.
- We used the private IP address range of 10.10.10.x - obviously you'll want to replace our internal IP addresses with your own
- We used a single Active Directory domain controller, to keep things simple. We then configured the following network settings, which is reflected throughout this document:
- Gateway: 10.10.10.1
- DNS: 10.10.10.3
- NTP: 10.10.10.3
- DC (Domain Controller): 10.10.10.3
- FreeNAS: 10.10.10.4
- We used a single Active Directory domain controller, to keep things simple. We then configured the following network settings, which is reflected throughout this document:
DNS Prep
- Create a DNS "A" record
Adding a FreeNAS user
- Create a FreeNAS user specifically for joining the FreeNAS server to the domain, named freenasAdmin
- Create a non-expiring password for user freenasAdmin
Pre-creating FreeNAS computer object in AD
- Create a computer account in preparation for joining the FreeNAS server to the domain. The name should match the "A" record you created earlier.
- Before clicking OK to finalize the computer account creation, click "Change" and assign the previously created user "freenasAdmin" the ability to join the server to the domain
- NOTE: Normal users in Active Directory CAN join computers to a domain, but there's a predefined limit of to how many times (it's 10) this can happen - this may not apply to Server 2008 and above, needs verification
- Before clicking OK to finalize the computer account creation, click "Change" and assign the previously created user "freenasAdmin" the ability to join the server to the domain
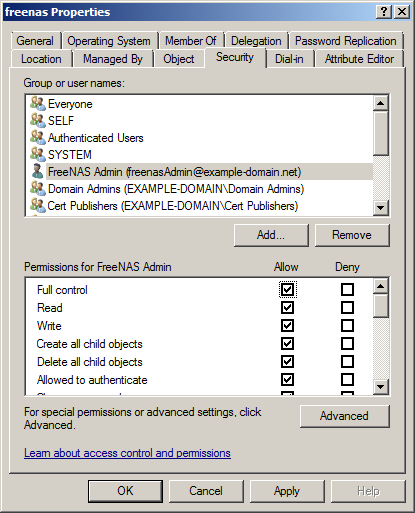
- Afterwards, right click on the "freenas" computer object, and select Properties, then click on the Security tab, and give the freenasAdmin user "Full Control" and click OK.
- NOTE: If you don't see the security tab, you need to switch your view to "Advanced Features" - you can see where HERE.
- Verify the accuracy of your server's clock - since every computer joined in the domain will be using the DC as a time server as well, it needs to be accurate.
NTP server prep
- From a CMD prompt, type w32tm /query /configuration - if NtpServer shows time.windows.com - you should really think about changing it.
- To change the time server to both use a more accurate clock, and redundant clocks, type the following:
- w32tm /config /syncfromflags:manual /manualpeerlist:"0.us.pool.ntp.org,0x1 1.us.pool.ntp.org,0x1 2.us.pool.ntp.org,0x1" /update /reliable:yes
- If you got any result other then "The command completed successfully", verify your command line. View an example successful result HERE.
- Restart the Windows time service by issuing the following command net stop w32time && net start w32time. View an example successful restart HERE.
- To change the time server to both use a more accurate clock, and redundant clocks, type the following:
FreeNAS setup
- If everything went ok, move on to FreeNAS setup
