Difference between revisions of "Permissions Management"
From FreeNAS using Active Directory Wiki
(getting started here ...) |
m (Getting closer) |
||
| Line 1: | Line 1: | ||
== About == | == About == | ||
| − | If you're an "I.T. Pro" you can probably disregard this section, as you should already know how to manager folder/file permissions on a file share. | + | If you're an "I.T. Pro" you can probably disregard this section, as you should already know how to manager folder/file permissions on a file share. Also, if you don't care that the default permissions is that EVERYONE can read/write/modify data on the share, skip this part. |
| + | |||
| + | === Computer Management === | ||
| + | * On your Windows server, click Start -> Administrative Tools -> Computer Management | ||
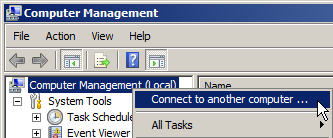
| + | ** On the left tree menu, right click on '''Computer Management (local)''' and select '''Connect to another computer ...''' | ||
| + | [[File:Windows Computer Management - change server.png]] | ||
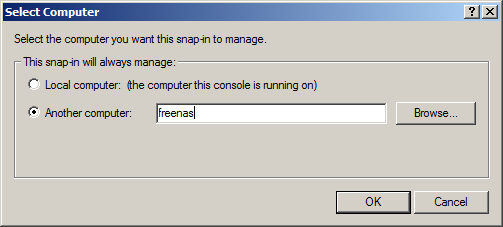
| + | ** Click the '''Another computer:''' radio button, and type in '''freenas''' (or whatever you named your FreeNAS server) | ||
| + | [[File:Windows Computer Management - changed server name.png]] | ||
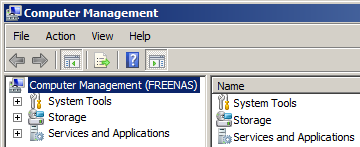
| + | ** Click "OK" - if there's no errors, you should now see '''Computer Management (FREENAS)''', like so: | ||
| + | [[File:Windows Computer Management - changed to FreeNAS.png]] | ||
Revision as of 01:19, 29 April 2014
About
If you're an "I.T. Pro" you can probably disregard this section, as you should already know how to manager folder/file permissions on a file share. Also, if you don't care that the default permissions is that EVERYONE can read/write/modify data on the share, skip this part.
Computer Management
- On your Windows server, click Start -> Administrative Tools -> Computer Management
- On the left tree menu, right click on Computer Management (local) and select Connect to another computer ...
- Click the Another computer: radio button, and type in freenas (or whatever you named your FreeNAS server)
- Click "OK" - if there's no errors, you should now see Computer Management (FREENAS), like so:


